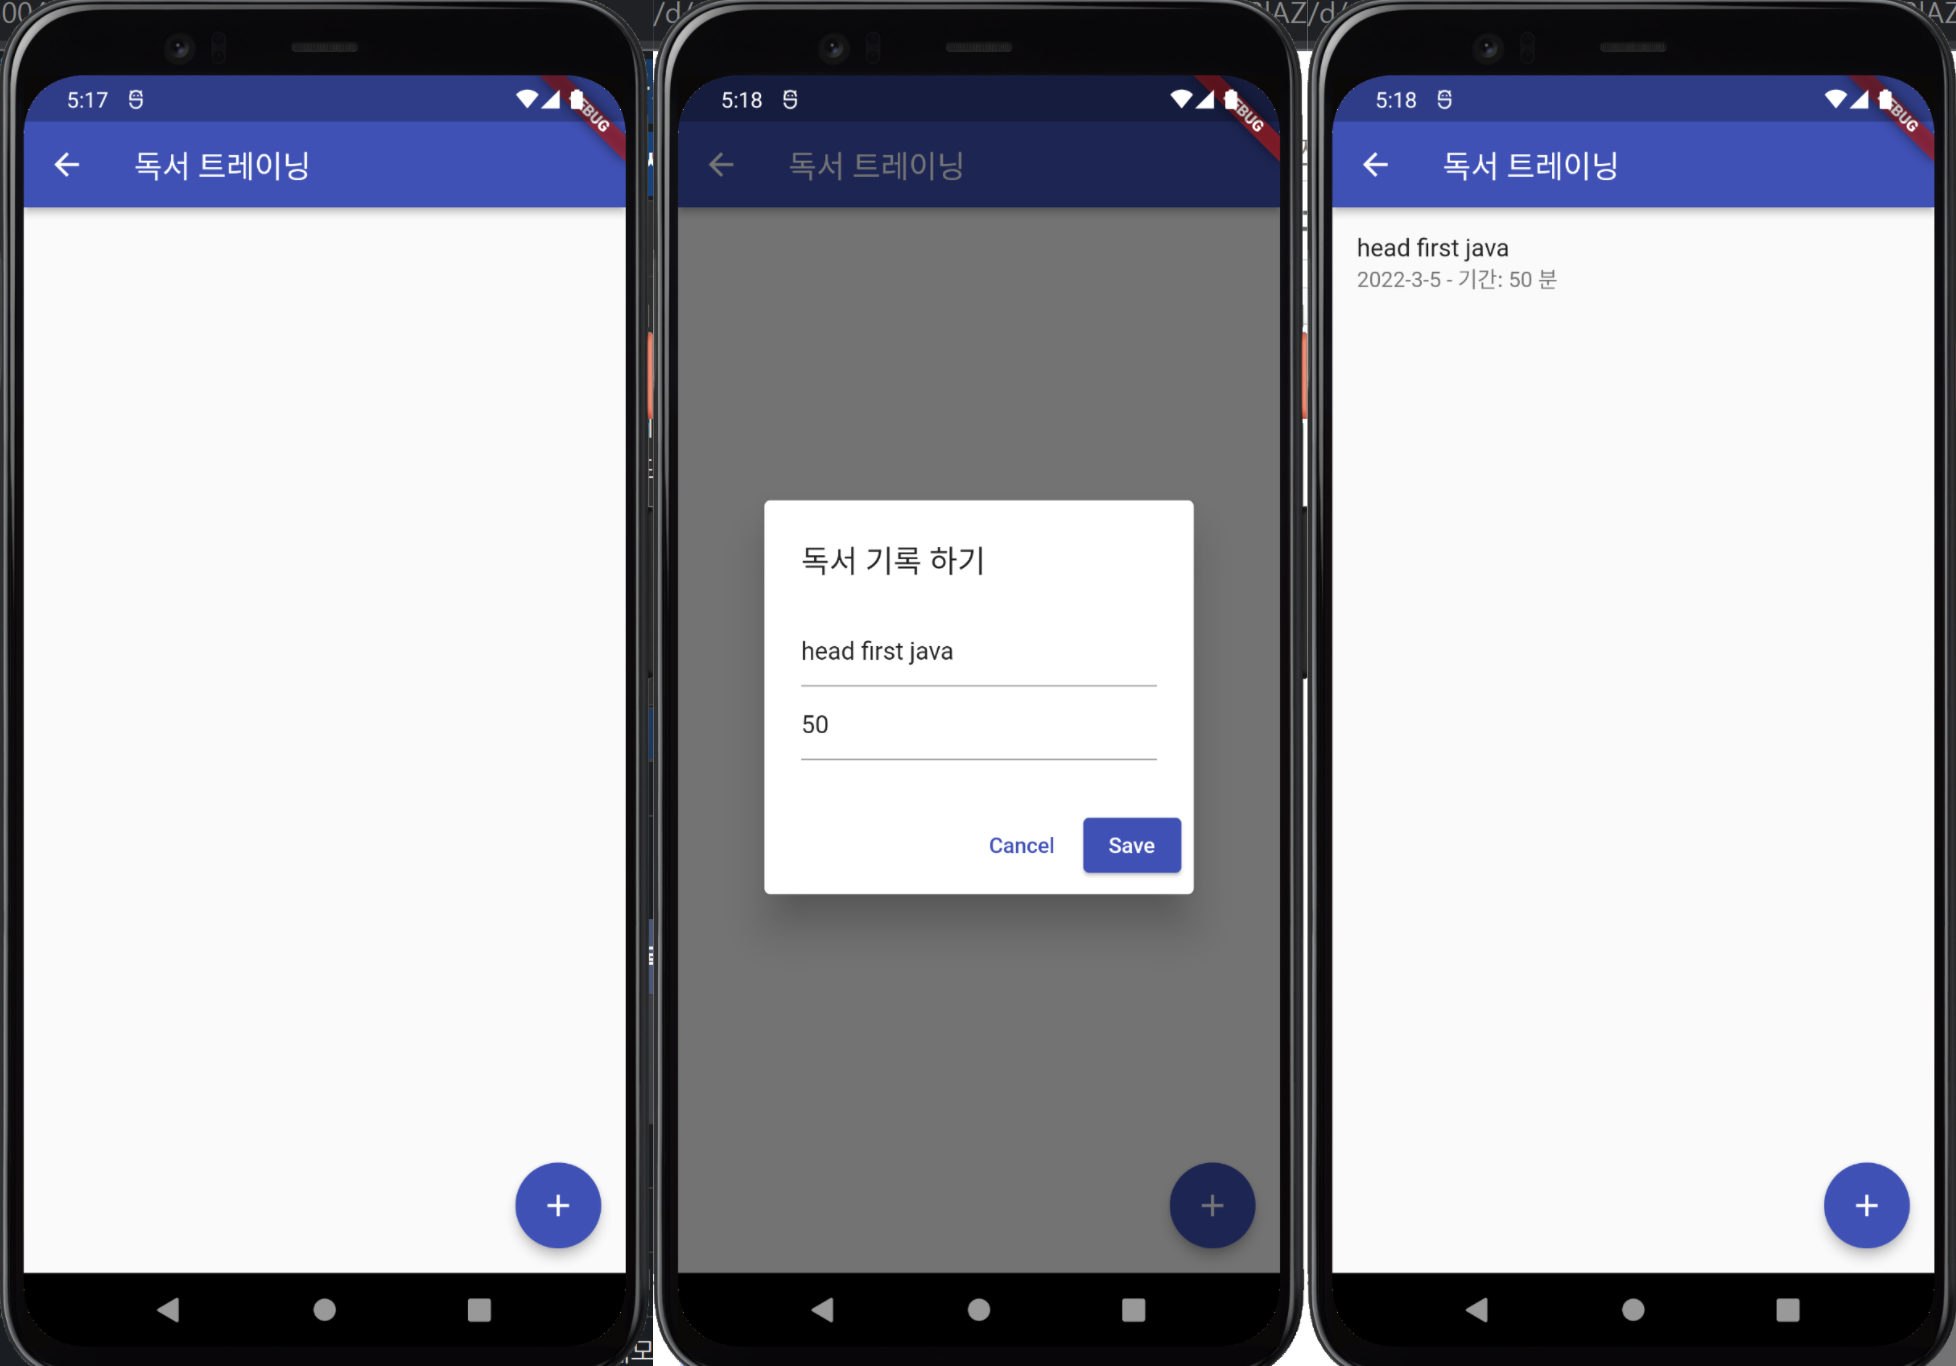
플러터에서 데이터를 앱에 저장하는 화면을 만들고 있습니다. 지난포스트에서 AlertDialog를 이용해 유저에게 데이터를 입력받아 SharedPreferencs 패키지를 이용한 쓰기 처리를 진행한 상태입니다.

앱에 데이터 저장은 되지만 저장한 데이터를 아직 확면에 보여주지는 못하는 상태입니다. 이번 포스트의 목표는 저장한 독서기록데이터인 performance를 가져와서 유저에서 UI로 보이게 하는 것입니다.
이번포스트는 다음 내용을 다루고 있습니다.
- SharedPreferences 데이터 읽기
- ListTile 위젯 메소드 만들기
- 위젯의 표시와 갱신
SharedPreferences 데이터 읽기 메소드 만들기
SharedPreference 패키지와 인터페이스 역할을 하는 SPHelper에서 읽기 메소드를 만들어 보겠습니다.

SPHelper 클래스에 performance의 리스트를 반환하는 getPerformances 메소드를 추가 하였습니다.
(1) Performance 타입의 리스트를 peformances 변수로 생성하였습니다.
(2) 현재 앱에서 SharedPreferences에 저장한 모든 키를 getKeys 메소드를 사용해 가져오고 있습니다.
(3) 모든 키를 얻었으므로 키를 통해 forEach메소드를 호출하고 있습니다. forEach 메소드에서 루프를 돌면서 key로 getString 메소드를 호출하여 저장된 데이터를 가져온 후 json.decode 메소드를 이용해 Json객체를 만들어주었습니다. 이 Json객체를 이용해 named constructor인 Performance.fromJson 생성자를 호출하여 Performance 객체를 생성하고 있습니다.
데이터를 읽어올 수 있게 되었으니 데이터를 표현할 UI를 추가할 시간입니다.
ListTile 위젯 리스트 만들기
performance_screen.dart 파일의 스테이트 클래스에서 변수 선언하고 UI를 추가 하겠습니다.

Performance 객체들을 담을 performances를 빈 배열로 선언 하였습니다. 다음으로 스캐폴드 body에 ListView를 추가하겠습니다.

body에 ListView를 추가하였고 children 속성에 ListTile 위젯을 만들어 리턴하는 getContent 메소드를 넣어주었습니다. getContent 메소드는 아래와 같습니다.

리턴으로 위젯 타입의 List를 반환하는 getContent를 만들었습니다. performances 의 forEach를 이용해 performance(책읽기기록)에 대해 각각 ListTile를 만든후 tiles에 추가 하고 있습니다. 이제 tiles에는 performances의 배열 길이 만큼 ListTile위젯이 들어있고 이것을 리턴해 줍니다.
ListTile 위젯의 표시와 갱신
performance데이터를 표현한 ListTile위젯은 언제 표시되어야 할까요?첫 화면이 표시될때 위젯이 표시되어야 할것이고, 데이터가 추가될때 다시 갱신되어야 할 필요가 있습니다. 먼저 initState 메소드에서 첫 화면이 표시될때의 초기화를 시켜주도록 하겠습니다.


initState 메소드에서 SPhelper의 인스턴스인 helper로 init 메소드를 호출하여 SharedPreferences의 초기화가 이뤄진 후에 then 을 이용하여 updateScreen을 호출하고 있습니다. helper.init 메소드는 비동기 처리이므로 then을 이용하면SharedPreferences의 인스턴스가 정상적으로 초기화된 후에 저장된 데이터를 가져올수 있습니다. then안의 함수에서는 다시 updateScreen 을 호출하고 있습니다. updateScreen 메소드에서 performance데이터를 가져와 맴버변수에 할당 하겠습니다.

updateScreen 메서드는 helper.init메소드의 콜백으로 호출되는 함수이니 SharedPreferences의 초기화가 담보된 상태입니다. 이제 getPerformances를 호출하여 저장된 데이터를 가져와 performances 변수에 할당했습니다. 마지막으로 상태를 바꿔줘야하니 setState를 호출 하였습니다.
앱에서 살펴보도록 하겠습니다.

이제 입력받은 값이 저장된 후에, 저장된 값을 가져와 화면에 잘 출력하고 있네요. 말로 설명하다 보니 부족한 점이 많지만 밑에 소스코드를 참고해 주세요.
import 'package:flutter/material.dart';
import 'package:hello_world/data/performance.dart';
import 'package:hello_world/data/sp_helper.dart';

class PerformanceScreen extends StatefulWidget {
  const PerformanceScreen({Key? key}) : super(key: key);

  @override
  _PerformanceScreenState createState() => _PerformanceScreenState();
}

class _PerformanceScreenState extends State<PerformanceScreen> {
  List<Performance> performances = [];
  final TextEditingController txtDescription = TextEditingController();
  final TextEditingController txtDuration = TextEditingController();
  final SPHelper helper = SPHelper();

  @override
  void initState() {
    helper.init().then((value) {
      updateScreen();
    });
    super.initState();
  }

  @override
  Widget build(BuildContext context) {
    return Scaffold(
      appBar: AppBar(title: Text('독서 트레이닝')),
      body: ListView(
        children: getContent(),
      ),
      floatingActionButton: FloatingActionButton(
        child: Icon(Icons.add),
        onPressed: () {
          showPerformanceDialog(context);
        },
      ),
    );
  }

  Future<dynamic> showPerformanceDialog(BuildContext context) async {
    return showDialog(
        context: context,
        builder: (BuildContext context) {
          return AlertDialog(
            title: Text('독서 기록 하기'),
            content: SingleChildScrollView(
                child: Column(
              children: [
                TextField(
                  controller: txtDescription,
                  decoration: InputDecoration(hintText: '책 제목&설명'),
                ),
                TextField(
                  controller: txtDuration,
                  keyboardType: TextInputType.number,
                  decoration: InputDecoration(hintText: '독서량(분)'),
                ),
              ],
            )),
            actions: [
              TextButton(
                child: Text('Cancel'),
                onPressed: () {
                  Navigator.pop(context);
                  txtDescription.text = '';
                  txtDuration.text = '';
                },
              ),
              ElevatedButton(
                child: Text('Save'),
                onPressed: savePerformance,
              )
            ],
          );
        });
  }

  Future savePerformance() async {
    DateTime now = DateTime.now();
    String today = '${now.year}-${now.month}-${now.day}';
    Performance newPerformance = Performance(
        1, today, txtDescription.text, int.tryParse(txtDuration.text) ?? 0);
    helper.writePerformance(newPerformance).then((_) => updateScreen());
    txtDescription.text = '';
    txtDuration.text = '';
    Navigator.pop(context);
  }

  List<Widget> getContent() {
    List<Widget> tiles = [];
    performances.forEach((performance) {
      tiles.add(ListTile(
          title: Text(performance.description),
          subtitle:
              Text('${performance.date} - 기간: ${performance.duration} 분')));
    });
    return tiles;
  }

  void updateScreen() {
    performances = helper.getPerformances();
    setState(() {});
  }
}
여기까지 수고하셨습니다. 아직 화면이 미완성입니다. 현재 입력시 id가 하드코딩 되어 있는 상태이므로 하나의 데이터밖에 입력이 안되는 상태입니다. 다음포스트에서 개선해 보도록 하겠습니다.
'프로그래밍 > Flutter' 카테고리의 다른 글
| [Flutter] 20. Dismissible 위젯 스와이프 삭제하기 (4) | 2022.03.08 |
|---|---|
| [Flutter] 19. 데이터 저장 앱 만들기4, SharedPreference ID관리 (0) | 2022.03.07 |
| [Flutter] 17. 플러터 데이터 저장 앱 만들기2 (AlertDialog 다이얼로그 위젯 입력 받기) (0) | 2022.03.03 |
| [Flutter] 16. 플러터 데이터 저장 앱 만들기1 (SharedPreferences 헬퍼 클래스, FloatingActionButton 위젯) (0) | 2022.03.02 |
| [Flutter] 15. 플러터 데이터 저장 패키지 Shared preferences 사용하기 (0) | 2022.03.01 |


댓글